Sunday, December 2, 2012

Christmastime


As much as I can appreciate each and every season, I'd have to say that Winter and Christmastime is my favorite.  It is during this time of year that I most miss my grandmother.

I believe that her spirit is with me every day.  I believe she is with me when I'm cooking, baking, painting, sewing, knitting, crocheting... in everything I do.  I believe that she would be proud of the wife, mother, and artisan I am today.

Always keep an open mind.  
Treat others with kindness.  
Be joyful.  
Love with all of your heart.

Wednesday, November 28, 2012

Chicken Chores


We've been home for a couple of days, but not until this morning have I had a chance to go out back and really spend time with the girls.  Even though it was very cold and wet, it was worth the hour or so to clean the coop, give the girls fresh bedding and water, and observe their little quirks that I've missed so much while our family was away on vacation.

I am thankful for really good neighbors and farmer friends to come by and visit and keep an eye on the girls (and kitty, too!)  While we were gone there was a LOT of rain and our back yard flooded.  The flooding wasn't news to us, but it was fortunate that the girls had keepers because they received an extra tarp for the coop (to shield them from sideways rain!) and a replacement bulb for their heat lamp.

If you haven't yet met the girls, Lucy is my Barred Rock hen, the black and white one snacking on popcorn; Penny is my Welsummer, the brown one ALWAYS at my feet; and Rita is my Araucauna and the most shy of the flock.

(Don't tell the other two, but if you were to ask me, I'd tell you that Lucy is my favorite.)


Thursday, September 6, 2012

Change Is Good!


It's September and the monkeys have gone back to school.  Monkey Number One is in third grade and Monkey Number Two is in first grade, now a FULL-TIME student.

What does this mean?

As both boys are now in school I have made myself available to the school as a volunteer as they may need me.  What this means is that after I get caught up on my current orders list, I will no longer be accepting requests for custom orders.

Don't worry!  This is not a bad thing.  What this means is that the creative time I am allowed will be used to create NEW and exciting things.  I will still be listing items for sale on Etsy, but they will be things made from my imagination and by things that inspire me in my every day life.  They will be original, unique, and one of a kind.   I promise, you won't be disappointed!

The rubber stamps that are listed, that are made-to-order, are still available and I will carve in the evenings and on days I am not needed in the classroom.  My current turn-around time is up to 5 days.  I anticipate still being able to meet that deadline, so there are no changes in my carving schedule.  I also expect to have new sock monkeys to introduce.  As many of you know, I have been missing the monkeys lately so I am excited to get to spend more time making them.  (I can't wait!)

One last note, our school has an annual Holiday Bazaar and I need to be able to create an inventory for that event.  (Busy, busy!)

Thank you very much for understanding.  Stick with me on Facebook as that's where you'll hear about what's new to the shop and discounts when they're available.

Wednesday, August 8, 2012

Please Don't Steal

So often in the arts and crafts community I see and hear that photographs are used by people without permission.  If you did not take a photograph, please do not use it as your own.  We should be honest with our work.  If you wish to use somebody else's photograph, you MUST ask permission first AND give them credit for their work.  An artist is deserving of recognition.

This did not happen to me.  Not that I know of.  But this morning I learned that many crochet and knitting pattern authors' work has been shared without permission and this saddens me.  I know that many times their patterns say, ON THE PATTERN: For personal use only - do not share or copy.  Please don't share or copy a pattern that has been paid for.  A pattern author works hard to create an original pattern and they sell it often times because they have a family to support.  Whatever the reason, they have the right to receive compensation and recognition for their time and effort.

Yesterday I posted a collage of photographs of a hat I made for a friend of mine.  I don't intend to sell this hat, but wanted to share my work with others.  I realized later in the day that I should have put a 'signature' or 'watermark' on it.  I'm curious to see how long it takes for somebody to use my photograph as an example to advertise for work they can do for others.  (Yes, that's stealing!) I'm sure they can re-create the hat, but this is MY photograph.  Make the hat.  I don't care.  But take your own photographs.

Always dream and shoot higher than you know you can do. Don't bother just to be better than your contemporaries or predecessors. Try to be better than yourself.
~William Faulkner

Friday, August 3, 2012

Soft Pretzels - From Scratch!

I made homemade soft pretzels the other day from a recipe on the Food Network website from Alton Brown and I can't stop thinking about them!  They truly were very easy to make and this is a recipe I'll definitely use again.  My dad is coming into town for a visit this weekend and I may just have to bake some more...

Monday, July 30, 2012

Day Hike to Multnomah Falls

This weekend I was fortunate to get out of the house and into nature on a sunny day.  The weather was perfect and no more than 81 degrees.  We couldn't have asked for a more beautiful day to take a hike to the top of Multnomah Falls in the Columbia River Gorge.  If you ever have an opportunity to visit this part of Oregon, I highly recommend a day trip to discover the beauty of the Historic Columbia River Highway US Route 30, and plan to make stops at the many waterfalls and trails along it's path. 

A view of Multnomah Falls from the trail.
A beautiful view of the Columbia River and the state of Washington from the trail.
The top of the trail to Multnomah Falls.  This IS the top of the waterfall.


Multnomah Falls
Vista House 
The view of the Columbia River Gorge from Vista House.

Thursday, July 26, 2012

Wool Dryer Balls

For a very long time now I've been wanting to make my own wool dryer balls.  I did a little bit of reading and it seemed simple enough: wrap wool yarn (a little tighter than you usually would) into a ball and felt it!  Here's what I did: 
 I picked up my basket of wool and got to work.  It doesn't take very long and I had 6 balls of yarn in no time.  I found a pair of hose to use to secure the balls (come on... focus) during the felting process and keep them from unraveling in the wash. Work one ball down to the toe of the hose and tie it off with string or knot it.  Repeat with the remaining balls until they're all secure.
 If you've never felted before, you should know that HOT water is important.  The hot water and agitation is what creates the felted surface in wool items.  This is why your wool garment care instructions are and wash COLD, lay flat to dry.  Here, we want to do the opposite.  Wash it HOT.  Toss them in the wash with some jeans so they have something to play with.  What I mean is that they need something durable in with them to help with agitation.  Don't forget the soap!  A bit of soap helps the process, too.
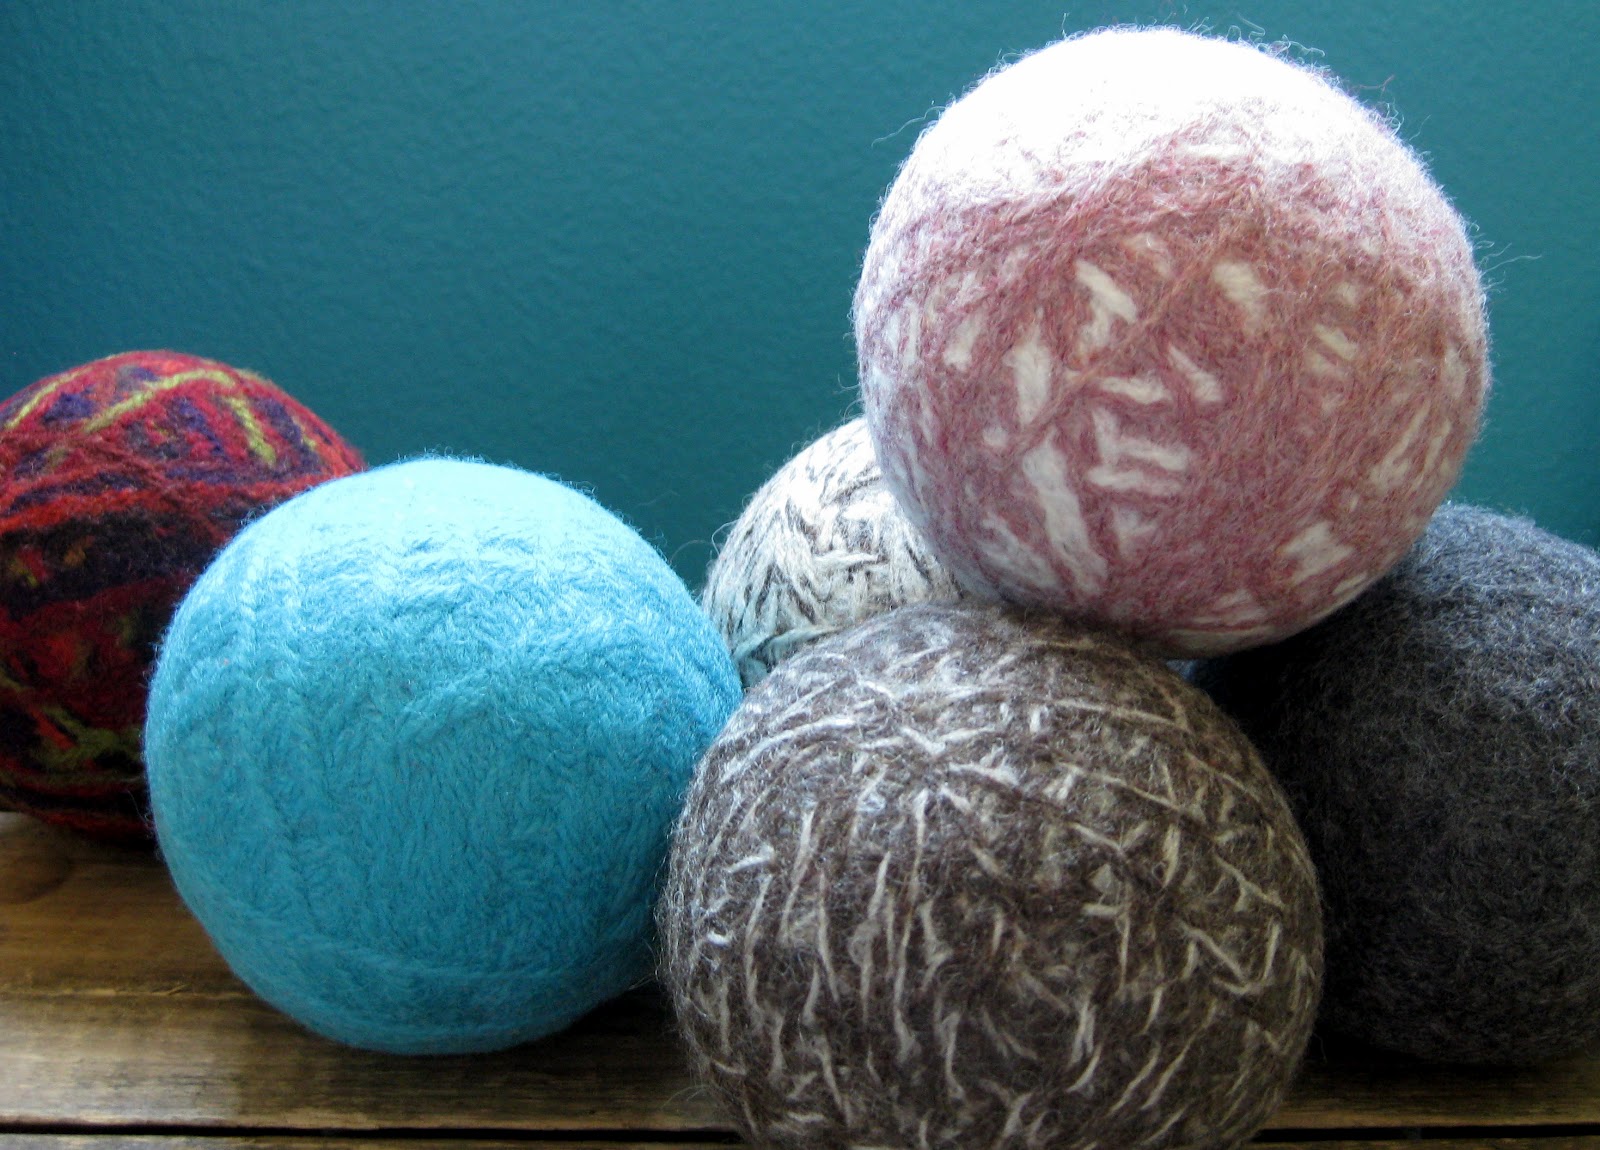
 After the wash, I tossed everything in the dryer.  More heat.  More agitation.  After the dry cycle was finished, I repeated the wash and dry process again.  I thought of doing it one more time, just to be sure but it really wasn't necessary.  As you can see, my balls are felted!
This is not a tutorial.  I'm in no position to tell you how to do yours.  Honestly, I'm bumbling along and experimenting with my fibers.  If I had done even more research before I had started I would have realized that I probably should have started with a core.  That's to say that I should have started with small amount of wool and felted it, then built upon it to create the final ball.  I think this is for shaping. I'm not sure if there's another functional reason for doing that.  Next time, though, I'm making a core!  I'd love to experiment to see what the difference is (there's the scientist in me coming out...)

Some have asked what the purpose of having wool dryer balls is.  Personally, I don't like spending money on dryer sheets (they're spendy!) Plus, they create a dangerous film on your lint screen (have you ever REALLY looked at that thing?)  Oh, and that film on your lint screen - what are those chemicals and do you want them on your skin?  Dryer balls reduce the amount of time it takes to dry a load by separating your clothing and allowing more air between garments.  They also reduce static.  Since I just made and started using mine, I can't confirm that claim personally but I'm looking forward to reporting that that's true.  Let's give it a few months.

You will want to use between 4-6 balls per load.  Take some time and do some research.  There's a LOT of information out there and most of it is very informative.  They truly are very easy to make.  If you can wind yarn, you CAN do this!  If you simply don't have the time or desire, check Etsy - there are many people who make and sell them just for you!  Either way, stop buying dryer sheets and creating even more waste in landfills.

Friday, July 13, 2012

Polymer Clay Garden Markers

It's been a long time since I've had an opportunity to play with polymer clay.  I had the pleasure of the company of a good friend and two of her boys today.  We made clay garden markers inspired by a pin on Pinterest for DIY Garden Markers by Amanda Wright of Wit and Whistle.

Ours turned out a little different, but THANK YOU Amanda for the inspiration!

Monday, July 9, 2012

Family Time

We don't do it often but this weekend our family had an opportunity to get away to the beach for the weekend.  
The boys had LOTS of fun playing on the Oregon Coast and exploring tide pools.  I love it when we return home and they're still talking about the things they did while they were away.  We needed this little break!
My Family (...and yes, that's me.  Coffee in hand!)

Saturday, June 16, 2012

Fresh Blueberry Muffins


Do you remember the Fresh Strawberry Muffin recipe I shared with you last week?  This is the very same recipe!  It's a wonderful recipe and I'm nothing but pleased with the results.

I got a good deal on local blueberries and simply substituted blueberries for the strawberries.  Actually, I mixed strawberries in with the blueberries for a few of these muffins... "Berry" delicious!


I hope you find an opportunity to try this recipe.  Be sure to come back and let me know how they turned out!  Remember, when mixing muffin batter, don't overmix!  Mix your dry ingredients into the wet ingredients JUST until it is moistened, then gently fold your berries in.  This will result in fluffy, tender muffins and your family will be asking for more.

Monday, June 11, 2012

When a Friend Gives You a Flat of Berries...

I was pleasantly surprised to receive a call from a friend asking if I'd like a flat of strawberries.  The answer, "Of course!"  This brought back childhood memories of my grandmother bringing flats of berries home from Oxnard.  Those were some of the best days.  We'd wash and eat berries until we just couldn't eat any more.

The boys' faces lit up very much the same way I'm sure mine did when I was little when they saw the flat in the kitchen.  We washed some and ate them.  Then, there was a heap of berries sitting on my counter and we had to do something with them.  They were VERY ripe and weren't going to sit well for long.

I hadn't made freezer jam since I was a child and that was with my grandmother.  I do have one memory of doing that with her.  I remember also that it was SO good!  I thought maybe it was time I made some for my family.

Strawberry Freezer Jam
 I love to bake muffins and wanted to try strawberry muffins.  I hit the internet for inspiration and stumbled upon a WONDERFUL recipe on a blog called A Recipe A Day.  It was an easy recipe and I'll bet you have most, if not all of the items already in your kitchen.  Bake these Fresh Strawberry Muffins and you'll surely bring a smile to the faces of your friends and family!


Monday, May 14, 2012

My Mother's Day Gift

I just had to share... This Mother's Day I received a gift more special than flowers and chocolate (GASP!  No, really!)  My husband put this video together with the help of our boys.  I hope you enjoy this as much as I did!

Sunday, May 6, 2012

Fresh Salsa

It will cost a few dollars and take a little bit of time, but this salsa is super easy to make and is very good for you!

FRESH SALSA

6 roma tomatoes, seeded
1/4 yellow onion
1 jalapeno, seeded
1 bunch cilantro

2 cloves garlic
1 lime
salt
pepper
cumin

Finely chop all veggies and squeeze juice from the lime. Add spices to taste (I'd guess about 1/4 tsp each.)

For best flavor, let sit in the refrigerator for a few hours to chill.

Of course, this is just what I did. Feel free to add more or take something out. Have fun and experiment with your own ingredients!

Monday, April 30, 2012

Reset Passport Stamp Project

I was quite surprised to receive an inquiry from my friends at Dark Horse Comics a couple of weeks ago about carving a set of rubber stamps for this year's Stumptown Comics Fest.  Writer and artist Peter Bagge was in attendance as guest of honor and the Exclusive Stumptown Comics Fest Passports were based on his comic, Reset.
It began with a transfers of Peter's illustrations.
Each stamp is carefully carved and mounted to wood.
Exclusive Reset Passports from Stumptown Comics Fest 2012
(SIGNED by Peter Bagge!!!) 
It was a lot of fun for me to walk around and collect my passport stamps and see them in action.  It was an overall FUN experience and look forward to attending more comics events with my family in the future.

I am pleased to say I DID get to meet Mr. Bagge, although briefly.  He's a very busy and popular man!  I've read Reset #1 and look forward to the next issue (there are four.)  This comic is not for the kiddos... that's okay, there are PLENTY more out there for them!


I did manage to make a little something for myself (and one for Kari, too!)  Reset brooches made from shrink film.  The color is pencil and outline is ink.  Each image was hand drawn onto plastic then shrunk, sealed, and assembled.


GRANNY SQUARE STATUS UPDATE:
I'm now up to 28 colorful squares!


Thursday, April 26, 2012

Fun With Shrink Film!

The things I do for my children!  
I've been experimenting with Grafix Shrink Film lately and this morning my Monkey #2 places a circle of film over the back of his notebook and tells me ALL about how I can color this Super Mario power and shrink it for him.

So, I did.  In the process I got to explain to him about coloring techniques: choosing and using different shades of colors, coloring from light to dark, and how to blend them together.  I hope he learned something from this morning's lesson.  I know I did!

I learned that you CAN color on shrink film with pencil if you scuff it with sandpaper first.  The color will look very pale, but becomes rather vibrant when you shrink the plastic.  The last image is our "coin" with Mod Podge Dimensional Magic to seal and protect our colored image.  The most important lesson: spending time with your child and teaching them about art is time well spent!
I love this little guy!